
Dynamic Cover System for bots
Emre Karay
Table of contents
(Press one of the headers to quickly navigate)
1. Intro
In the many years of playing games, I noticed that majority of the games I play(ed) use(d) some sort of bot; zombies of Left 4 Dead/World War Z, bots in CS:GO/Shadow of Mordor/The Division and many more. Many of these bots make the game fun, interesting or have a nice way to test your skills. Using an AI could make the game less stale or even challenging, so having a basic (or advanced) knowledge about AI, I think is an imported skill to have when creating games.
In my free time, I created a basic FPS aim trainer, which had basic targets moving around and was not that interesting. I stopped working on that project a while ago. When creating the trainer, many times I used CS:GO as a reference or as an inspiration. Valve did a great job in creating many FPS games. I played almost all of their games, so I already had a general idea how things worked.
For this project, I wanted to recreate the bots that are being used in CS:GO. Besides doing desk research in how Valve made their bots, I also played against these bots. This time not to try to get many headshots as possible, but to go in-depth on how these bots behave to certain actions. With the knowledge I gained, I tried to recreate some aspects of these bots.
I ended up creating a cover system for the bots, one that is dynamic and only uses the vision the bot can see. When the bot spots an enemy, it has the decide what to do. Either figure out a viable cover spot and go towards it or keep strafing until it can see one. I wanted to try a realistic type of behaviour, instead of making the bot aware of it surrounding (to a degree) or give it extra information than it can see.
2. Scope
For the project I set up some criteria. The must points are the base of the project and are somewhat simple. Having the ‘should’ will be the challenging part for me. Anything after that will be either polishing or maybe something I will do at the end or after the R&D.
Must
For the must I want at least to have a state machine working which can handle multiple states. For the states I want to have at least one state that will control the movement of the bot, so it knows to switch to different destinations and a shooting state that will realize that there is a target and do something with it.
Should
This part will be the improvement or expending part of the must. I want to have the behaviour tree working with the state machine, this will help me with expanding of the states. The movement of the bot will be improved with different states like taking cover or moving while getting shot. I will try to make the bot smarter and give it different options when deciding what to do.
Could
If I manage to get the two previous parts done faster than I expect, I will work on this part. This part will be mostly working on the team deathmatch mode, different difficulties of the bots and do some polishing on the UI and animations, maybe even tweak the states for smarter bots.
Final Scope
Midway of the project, I decided to go for the following scope:
Creating a bot with a patrol, spot enemies, shoot, a dynamic vision based finding and taking cover behaviour.
3. Pathfinding
For the bot to able to walk around the map and find the player, it needed some way to get to the player. One of the options was writing and using one of the popular pathfinding algorithms like:
- Dijkstra’s algorithm
- A* Search
- Sample algorithm
Seeing that I took Counter Strike Global Offensive as reference when working on this project, I did some research on how Valve decided to solved their pathfinding mechanic. CS:GO makes use of the Source Engine and Source Engine makes use of something called ‘NextBot’ and navigation meshes for their AI. The data that is being created by the navigation mesh, allows these bots to ‘know’ how to move around in the environment. These meshes have different areas. The areas decide what kind of action the bot has to take (Navigation Meshes, n.d.). For example:
To support the community made maps, Valve included an option to automatically generate a navigation mesh. I am going to guess that Valve uses some kind of algorithm to decide these areas automatically, since it takes a few steps to create the mesh, like computing specific spots (Navigation Meshes, n.d.).
It is possible to use areas with NavMesh. NavMesh has the option to create and assign areas, similar to layers in Unity. The problem is that I either have to assign them manually to each object or create an algorithm, probably like Valve did, and let it generate on its own. Coming up with an algorithm like that could take some time. I decided to use NavMesh, since it is similar to how Valve did it and not use areas at all and let the states take care of all the actions.
NavMesh
The way NavMesh works, is by taking all static game objects’ render meshes in the scene and then processing and baking it into a navigation mesh. The baking of the mesh can be tweaked, for example changing the size of the agent (the agent is the object that is being moved around) or which specific game objects will be used as a terrain. This will change the size of the mesh or how the agent will perform (Unity, 2020).
By importing map assets with a pre-made scene, I had a basic map were the bots could move around on. Applying the NavMesh on the scene looked like this:

The blue indicates where the agent can move and on the end of some platforms, there is an arrow indicating that it is possible for the agent to jump from one side to the other. After adding the NevMeshAgent component onto the bot and giving the bot a destination, the bot could move.
4. Implementing Behaviour
4.1 Options
The AI could walk, but that was the only thing it could do. I wanted more than that. There were a couple options what I could do.
If and else
Make a script with if and else statements, give it some conditions and let it run. Pretty much the basic of how an AI works. Expending on this and adding different kinds of conditions could get messy and maybe end up as spaghetti code, not the best idea.
State Machine
State machine are commonly used when implementing an AI. It’s a simple solution with great results. The idea is to switch between states when a condition has been reached. The AI can only be in one state at the time. An example:

Behaviour Tree
Bit more complex than the state machine, but able to run more than one state at the time. Behaviour Tree also helps when you have too many states to a point where it gets hard to keep track of all your states. Another point can be to avoid copy pasting the same conditions over and over again.
4.2 State Machine
I started off with the state machine, because it was simple and is commonly used to create an AI. For creating the state machine, I used one of Infallible Code’s (2020) videos as a reference. The State Machine I used, made use of a something called a state pattern. This method was different that using a switch case with all the different all states. I created a class for every state and wrote my logic inside of that class. For the state pattern to work with the state machine, I needed to create at least three classes:
- Context class for the bot.
- A state machine class (or state handler) to switch to the correct state.
- A state class. This will be the base class for all the different states to inherit from the base class and then be modified with its own behaviour.
Switching between states, I could use a main class, where there are conditions in switching to every state, or I have separate conditions in every state and let the AI decide which state it will switch to. I decided to go with the second option, because I wanted to avoid having everything in one class, that could get confusing if it had too many states.
I started with four states: spawn, track, patrol and shoot. I made a diagram to give myself a better view and decide which states to connect with each other. The first diagram looked like this:

Illustration 4: State Machine Diagram with a couple of states.
Press image for the fullsize.

The idea is; that the bot start with the spawn state, then checks if there are enemies nearby, if so, switch to shoot state. If not, switch to patrol, walk towards destination and keeps checking for enemies. This was working, but after some feedback, it might be better to combine track and patrol state, so I came up with this:

Illustration 5: Updated State Machine Diagram with a couple of states.
Press image for the fullsize.

This is the same as the first diagram, but this time the patrol state keeps checking for enemies and deciding to switch to shoot state.
Example of the patrol state:
public override IEnumerator Start()
        {
            AI.fov.FindVisibleTargets();

            if (AI.fov.visibleTargets.Count > 0)
            {
                AI.navMeshAgent.isStopped = true;
                AI.SetState(new Shoot(AI));

                yield break;
            }

            yield return new WaitForSeconds(0.05f);
            if (AI.navMeshAgent.velocity.magnitude < 0.01f)
            {
                AI.navMeshAgent.SetDestination(AI.blackboard.GetRandomCheckpoint());
            }

            AI.SetState(new Patrol(AI));
Just like the diagram, I want the patrol state to check if there are enemies, if so, switch to a shoot state, else rerun the same state. Doing this I had to set a delay so it would not run too many states and overload the game.
4.3 Behaviour Tree
The information and references I used, are from a blogpost that Chris Simpson (2014) wrote about how a behaviour tree works and how he used it for his game. A behaviour tree, like the name suggests, is a tree of nodes, but these nodes have a common behaviour: returning statuses. There are three common statuses:
- Success
- Failure
- Running
If the node succeeded in performing its operation, it will return success to the parent and the opposite for failure. The running status is called whenever the node is still determining if it succeeded or failed, which means it is still running. The node will be ticked again next time the tree is ticked, at which point it will again have the opportunity to succeed, fail or continue running.
For example when a bot needs to walk from point A to B. When it reaches point B, it will return Success. If it cannot reach this point, maybe because it was killed, it will return Failure. If it still working on getting there, it will return Running and be checked again in the next tick of the tree.
There are different kinds of nodes, but there are three main archetypes of behaviour tree node:
- Composite
- Decorator
- Leaf
Composite
A composite node can have one or more children. The node will process every child, depending on the outcome of the children; it will return a status to the parent. The two common composite node are a Sequence Node and a Selector Node.
Sequence node is a node were it runs every child in a sequence and returns Success when every child succeeds, or returns Failure at the first child that returns Failure and stops checking the rest of the children. This can be used for ‘AND‘ conditions.
Selector Node is kind of the opposite of the sequence node. The selector node will stop running its children, when one of the children returns a Success status. This can be used for ‘OR‘ conditions.
Decorator
Like the composite node, the decorator node can have a child node, but only one. The function of this node is either to transform the result they receive from their child node’s status, to terminate the child, or repeat processing of the child, depending on the type of decorator node.
A common decorator node is an Inverter node. It will simply invert the status of the child. If it is a success, it will switch to failure and vice versa for failure.
Leaf
A leaf node does not have any children. This node will be used to perform actions, commonly known as an Action node.
To create a behaviour tree, I used the Aivo library. Not really a specific reason why I decided to use this library, other than that I got it recommended. I could have written my own behaviour tree, but that would have made my scope a lot bigger, so I decided not to.
Result

Illustration 6: Behaviour Tree of the bot.
Press image for the fullsize.

The tree is a combination of the four states: spawn, patrol, shoot, finding and taking cover.
At the beginning, implementing a behaviour tree was a bit annoying, at least if you want to have the correct result. I noticed that my AI would work and run its states, but after debugging the tree, I would get a different result than I desired. This meant I did something wrong in tree, but was heading the correct way. After some trials and errors, combining trees and returning correct statuses, the tree was working correctly and I had a better idea on how to design a behaviour trees.
A behaviour tree, in my opinion, is like a double edged sword. The hardest part about implementing the tree, was designing a logical tree. This could take some time, depending if you want to do it correctly (the bot was working, but I was not getting the correct status back). However, once you get the hang of the design, making changes or adding new features made it a lot easier.
For example if, for some reason, I want the bot to only check if it is below half health when there is a available cover, I can simply add the check health action node to the first sequence. The behaviour of the bot won’t make that much sense, but just to show how easy it is, a example of the code:


I can quickly test if I am satisfied with the result, if not, I can change it back. This is a part of the state’s tree inside of a class, but this also works with adding or removing a state(s).
4.4 Comparison
After doing research on the advantages and disadvantages of a State Machine and a Behaviour Tree (Colledanchise & Ögren, 2019; Finite State Machine (FSM)| Classification, Application, n.d.; Finite State Machine (FSM) : Types, Properties, Design and Applications, n.d.; Nath, 2019a, 2019b),
I narrowed it down to a simple table:

After implementing both techniques:

Difficulty
The reason why BT was harder than FSM had a couple of reasons. Before implementing the structure, you have to understand how it works. The article of Chris Simpson does a great job in explain how a BT works, but there is no information or examples how to implement it in to your game. Mainly because there are many ways to implement BT, either in your own way or by using a library. For a beginner, this makes it a lot harder to get started with BT. Not just in this article, but while trying the find documentation or even a video explain how to implement BT, I had a hard to time finding information explaining in how to use it, instead of what it is.
An other reason, was the design of the tree. As someone who is not a designer, I had a hard time drawing out a diagram were the states were correctly linked to each other. Not to make it too complex or repeat any code, while getting the correct result and behaviour. Compared to a FSM, I just add an if statements with conditions and switched between states when a condition was met.
Scaling and Maintaining
After finishing basic states like patrol and shoot with FSM, I already started noticing how messy the code was getting. If I kept going and adding more states, I would have to start rewriting code or find a different solution in implanting new states.
For example, if I wanted to add a new state, I had to add an if-statement. I was even using ‘WaitForSeconds’ to not bottleneck the code. Making changes was getting messier, while with BT this was not the problem.
public override IEnumerator Start()
        {
            AI.fov.FindVisibleTargets();

            if (AI.fov.visibleTargets.Count > 0)
            {
                AI.navMeshAgent.isStopped = true;
                AI.SetState(new Shoot(AI));

                yield break;
            }

            yield return new WaitForSeconds(0.05f);
            if (AI.navMeshAgent.velocity.magnitude < 0.01f)
            {
                AI.navMeshAgent.SetDestination(AI.blackboard.GetRandomCheckpoint());
            }

            AI.SetState(new Patrol(AI));
Prototyping
FSM makes it great to use for prototyping. With the minimal to no-need of a design or knowledge, it is easier to quickly put together some basic features and test. I actually ended up doing that. At the start of the project, I used FSM to try and test some potential ways I could code some of the states for the bot. After getting to know the basics of AI behaviour, I switched to BT and started scaling from there on. I had to convert the code, but the logic was already there.
Power Expensive
Compared to FSM, BT has to go through every tree until it can get back a success status. Depending on the width or depth of the tree and times it needs to update, this can be a heavy a performance. On the bright side, it gives the bot a realistic behaviour. For FSM it is easier to guess the output, since the states are linked to each other. The reason why I left the table blank is because the scale of the project was not that big to notice performance issues and I did not test ‘TakeCover’ state with FSM to make a fair comparison.
Code Response
Behaviour Tree returns a status while running a state. When it fails, it will go to the next state or when it succeeds, it will run the code. Debugging the status made it easier to find the potential problem with where the problem in the code could be. While with FSM, I had to look at the output of the bots behaviour and figure out where it went wrong. This was more like a personal reason point.
5. State Example
For the majority of the project I was busy trying to implement ways to use the behaviours, instead of creating behaviours. Most of the behaviours I created are kind of simple, but the ‘take cover’ state has bit more logic behind it, that is why I want to go a bit more in-depth on that part.
5.1 Take Cover
Context
Before I start explaining how the cover system works, I want to tell why I decided to do it the way I did it. At the start of the project, the way I wanted the bot to take cover was by manually adding positions where I was sure that the bot could actually stand behind and recognize it as a cover area. For example if there was a box, I would have to manually add ‘positions’ on each side of every corner. Doing this would take forever and would not be great to use for different maps. I had to come up with an idea where the system could be dynamic without having to setup much for the bot.
I tried looking for tutorials or any guides on how this has was by other people or even by developers of CS:GO, but without much luck. There is not much documentation on how the developers of CS:GO created the logic behind their bots, other than the navigation mesh. Trying to find what other developers did, I either ended up with a couple of tutorials which showed how to implement cover animations and not really a system in finding cover, or creating AI behaviour with some sort of graph system in Unreal Engine or even assets which I had to pay for in order to use. Therefore, I decided to come up with my own dynamic cover system and have at least something I could talk about. Most of the logic comes from my own experience as person who mainly played shooter games and by testing the behaviour of the CS:GO bots.

The ‘TakeCover’ is a state that is a part of the AI behaviour tree. This diagram only shows the steps in taking cover and partially when to take cover. The ‘below half health’ is a simple check to prevent the whole tree to run and may cause heavy performance, at the same time not to always take cover. If the bot is below half health it has two options; either checks for a cover spot and walk towards that spot or if that fails, walk the opposite direction of the enemy (mostly likely backwards) until it finds a cover spot and walks towards it.
Finding Cover
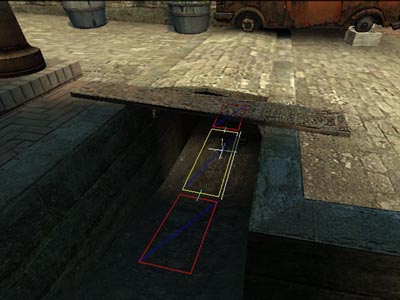
For the shoot state I used one of Sebastian Lague’s (2015) videos to create a field of view, which I used as the eyes of the bot. For the cover state I only needed the part where it converted an angle in to a direction. To give a better idea how the logic works, I created visualization.
You might be wondering what these lines actually mean. “The numbers Mason, what do they mean?” A quote from Call of Duty: Black Ops, except this time it is about lines.
The cone looking shape is the field of view of the bot. I used the angle of the field of view to calculate the direction of the raycasts I was going to use. I needed a way to know if there were any obstacles in the sight of the bot that could be used as a covering spot. That is what the blue lines are for.

To decide how many ray casts I needed, I divided the distance from the bot to the target (the orange line) by five, since I knew that the max range was thirty and that it would give me a small number so that it would not be too heavy on performance, and added two for at least three ray cast (if we count zero). The reason why I did this; is if the target is further away, it gives the bot a bigger angle of the field of view to find a cover spot, which means I needed more checks. Then I divided the FoV angle by the amount of ray cast and ended up with the angle between ray casts:
float dstToTarget = Vector3.Distance(AI.transform.position, AI.fov.visibleTargets[0].position);
            int raycasts = (int)dstToTarget / 5 + 2;

            float degrees = AI.fov.viewAngle / raycasts;
Well, a wall was found, now what? I had to make sure the wall could be used as a covering spot. To do this I used a ray cast, the pink one, from the target to the found spot and checked if there were any obstacles between them. If so, I knew the bot was behind cover. I checked if the spot was reachable by creating a path, the green line, and had to decide which cover to take. I calculated the distance of each valid path and picked the one that was the shortest and at least shorter than the distance between the target and the bot. I do not want the bot just to ignore the target and walk past it.
     for (int i = 0; i < raycasts; i++)
            {
                Vector3 raycastDirection = AI.fov.DirFromAngle((-AI.fov.viewAngle / 2) + (raycastDegree * i), false);

                // Checking for obstacle
                if (Physics.Raycast(AI.fov.transform.position, raycastDirection, out RaycastHit hit, AI.fov.viewRadius, obstacleMask))
                {
                    // Get closest edge of picked position
                    if (NavMesh.SamplePosition(hit.point, out NavMeshHit navHit, AI.navMeshAgent.height, NavMesh.AllAreas))
                    {
                        // Checking if AI can hide behind obstacle without being seen by player
                        if (Physics.Linecast(AI.fov.visibleTargets[0].position, navHit.position + agentHeight, obstacleMask))
                        {
                            NavMeshPath path = new NavMeshPath();
                            NavMesh.CalculatePath(AI.transform.position, navHit.position, NavMesh.AllAreas, path);
                            float dstToCover = 0f;

                            if (path.status == NavMeshPathStatus.PathComplete)
                            {
                                // Gets path length
                                for (int corner = 0; corner < path.corners.Length - 1; corner++)
                                {
                                    dstToCover += Vector3.Distance(path.corners[corner], path.corners[corner + 1]);
                                }

                                // Picks best path
                                if (dstToCover < dstToTarget && dstToCover < shortestPath)
                                {
                                    shortestPath = dstToCover;
                                    _availableCover = navHit.position;
                                }
                            }
                        }
                    }
                }
            }
No cover found
With the criteria I gave the bot, it was not always possible to find a cover spot. For example when there might be one right beside or behind it, what then? Instead of telling the bot that there is one, I wanted to make sure the bot saw one first. You do not have eyes on the back of your head to check for a spot. You might memorize the map, but bots do not panic and make mistakes, so this would make them a bit too good. You neither want to spin around to check for potential cover spots while getting shot, this will lower your chances of surviving. The only thing that is left to do is to walk either backwards or sideways until you hit something.
Whenever the bot cannot find a cover it sends raycast to each side, except forwards, and checks for the longest path it can take. You might be wondering how it would know the longest path if it cannot see it? Well you can kind of see the left and right corner of your eye. If there was a wall, you would notice it and as a last resort walk backwards.
I noticed when the bot’s back was close against a wall, it started moving left and right because one side of the path was eventually getting longer than the other. It created a ‘strafing’ movement, an act of moving sideways, commonly used tactic in shooter games. Instead of fixing this, I decided to leave it as a feature, “It’s not a bug, but a feature”.
Result
6. Future reference
Overall I am happy with results. I got the state machine and behaviour tree to work. I finished the ‘must part’ of my scope and got part of my ‘should part’ done. I was hoping that I could finish all of my ‘should part’, but I pretty much overestimated how much work the states would take. Midway I noticed that the ‘shooting part’ would take too long, so I decided to drop that part and focus on the movement of the bot, so that I could atleast finish some part of it. I already knew the ‘could part’ of my scope would be too much, so I am not that worried that I could not finish that part.
In the future I would probably try to find a better or at least an improved way that has a less task performing ‘take cover’ system. The current one still needs tweaking, for example find a better way when the bot cannot find a cover spot and when it finds a covering spot, it will fully stand behind the cover and hold it.
Outside of that, when the ‘shooting part’ and the ‘movement part’ of the bot is finished, I think it would be fun to still create the team deathmatch mode with multiple bots. Even creating more states for the bot to use would be interesting.
7. Sources
Colledanchise, M., & Ögren, P. (2019). Behavior Trees in Robotics and Al (4th ed.). Taylor & Francis. https://arxiv.org/pdf/1709.00084.pdf
Finite State Machine (FSM)| classification, application. (n.d.). Electronics Club. Retrieved June 20, 2021, from https://electronics-club.com/finite-state-machine-fsm-classification-application/#Advantages_of_FSM
Finite State Machine (FSM) : Types, Properties, Design and Applications. (n.d.). ElProCus. Retrieved June 20, 2021, from https://www.elprocus.com/finite-state-machine-mealy-state-machine-and-moore-state-machine/
Infallible Code. (2020, January 5). How to Code a Simple State Machine (Unity Tutorial) [Video]. YouTube. https://www.youtube.com/watch?v=G1bd75R10m4
Nath, K. (2019a, January 20). State Machine Design pattern —Part 1: When, Why & How. Medium. https://medium.datadriveninvestor.com/state-machine-design-pattern-why-how-example-through-spring-state-machine-part-1-f13872d68c2d
Nath, K. (2019b, January 22). State Machine Design pattern — Part 2: State Pattern vs. State Machine. Medium. https://medium.datadriveninvestor.com/state-machine-design-pattern-part-2-state-pattern-vs-state-machine-3010dd0fcf28
Navigation Meshes. (n.d.). Valve Developer Community. Retrieved March 2, 2021, from https://developer.valvesoftware.com/wiki/Navigation_Meshes
Sebastian Lague. (2015, December 26). Field of view visualisation (E01) [Video]. YouTube. https://www.youtube.com/watch?v=rQG9aUWarwE
Simpson, C. (2014, July 17). Behavior trees for AI: How they work. Gamasutra. Retrieved March 2, 2021, from https://www.gamasutra.com/blogs/ChrisSimpson/20140717/221339/Behavior_trees_for_AI_How_they_work.php
Unity. (2020). Building a NavMesh. Retrieved March 2, 2021, from https://docs.unity3d.com/Manual/nav-BuildingNavMesh.html
Illustrations
Bevilacqua, F. (2013, October 24). FSM enemy brain [Illustration 2]. Finite-State Machines: Theory and Implementation. https://cdn.tutsplus.com/gamedev/uploads/2013/10/fsm_enemy_brain.png
Nav crouch. (n.d.). [Illustration 3]. Navigation Meshes. https://developer.valvesoftware.com/w/images/b/b8/Nav_crouch.jpg

