
Spider-Verse Effects
Made by Gijs Westerdijk.
If it ain’t broke, break it.
Sony Pictures Animation

1. Introduction
For the individual assignment of the gameplay engineering semester, I created a collection of post-processing effects and shaders that aim to recreate the visual style of the Spider-Man: Into the Spider-Verse movie.
I decided on this project because I wanted to learn more about writing shaders using HLSL. I had previous experience creating shaders using unity’s shader graph but I wanted to take writing shaders a step further. I knew the project would consist mostly out of custom lighting shaders and custom post-processing effects, both of which I have very little experience in and am very eager to learn more about.
The aim of this project is to recreate the visual style of the Spider-Verse movie for real-time game applications. I also want to publish this project on the unity asset store so my effects can be used in other people’s projects. To create this project I used unity’s built-in render pipeline together with the post-processing stack v2. I chose to use the post-processing stack v2 because it has its own volume system which greatly improves the ease-of-use for my effects. Creating custom effects using PPv2 also makes it a lot easier to combine those effects together with other effects from the asset store. The reason I’m not using the Universal Renderpipeline even though I would have liked to is that it currently lacks support for custom post-processing effects (Unity Technologies, 2019).
The original scope of the end product consisted of a custom halftone lighting shader and the following two post-processing effects.
- Halftone bloom
- CMYK Offsetting Depth of Field
With these four effects as possible extras.
- Hand-drawn frames
- Smears/CMYK motion blur
- Halftone Light shafts
- Animation on twos
During the project, I did have to reevaluate what effects would realistically be achievable in the given timeframe. I decided the halftone light shafts wouldn’t fit the scope of the project, especially if I wanted to make them volumetric. I also decided not to add the animations on twos as this didn’t have much to do with shaders and is more focused on unity’s animation system. I did add a Prowler Vision post-processing effect as an optional effect. At the start of the project, I created a publicly available Trello board to plan and keep track of my progress and to-do lists.
2. Custom Halftone Lit shader
To recreate the visual style of the Spider-Verse movie I created a surface shader with custom lighting functions that use halftone pattern textures. There are 4 custom lighting functions for diffuse, specular, a side-shine, and global illumination. These custom lighting functions use grayscale textures to determine the patterns of the shadows.

2.1 Halftone texture sampling
To create the halftone lighting effect the shader uses gray-scale textures to determine whether a surface should be lit or in shadow. Let’s take the diffuse lighting method as an example. The basis for this lighting calculation is the dot product between normal and the light direction, this results in a value between -1 and 1 (Learn OpenGL, z.d.-a). This value is then used in combination with the value of the halftone texture and passed through the step function. This results in a shader where every pixel is either completely lit or completely in shadow with the pattern being visible at the transitions (NVIDIA, z.d.-b).
half NdotL = dot(s.Normal, gi.light.dir);


NdotL = smoothstep(-_ShadowSize, _ShadowSize, NdotL);

#ifdef SCREEN_SPACE_UVS
    float2 uv = TRANSFORM_TEX(s.diffusePatternUV, _DiffusePattern) * 1000;
    float val = max(tex2D(_DiffusePattern, uv), 0.001);
#else
    float val = max(tex2D(_DiffusePattern, s.diffusePatternUV), 0.001);
#endif

color.rgb = color * gi.light.color.rgb * step(val, NdotL);
color.a = s.Alpha;
2.2 Custom shader GUI
To ensure the usability of the Halftone Lit shader I modeled the shader GUI to unity’s Standard shader. I did this because users will already be familiar with this GUI. But because the Halftone Lit shader requires properties that aren’t found in the Standard shader I did have to make some modifications to fit these requirements.


The main additions are the texture slots for the halftone patterns. These are split into three segments each with configurable settings. Because not every object will require the specular and side shine lighting types I added a system that disables these features when the pattern texture slots are kept empty. This system also enables and disables keywords within the shader that make sure the correct shader variant is used (Unity Technologies, z.d.-d).


To be able to fully replace unity’s Standard shader I also wanted the Halftone Lit shader to have a way of switching between different rendering modes, such as Opaque and Transparent. I planned on implementing a dropdown menu similar to the one used in the Standard shader. Unfortunately, I wasn’t able to add this feature because implementing this would require reworking the entire shader as a vertex shader instead of a surface shader. The reason for this is that to make a transparent shader the #pragma surface needs an optional transparency parameter (Unity Technologies, n.d.-f). This means that this parameter cant be controlled using keywords, unlike with vertex and fragment shaders where the transparency is a separate #pragma (Arycama, 2017). Not setting the alpha parameter results in geometry that doesn’t blend with the background as you can see in the image below.

2.3 Additional features
Outside the main features of the shader outlined in the previous chapters, there are also some smaller features I wish to outline here. First of all, there is the option to toggle “Halftone Screen-space UVs”. This option controls whether the halftone patterns should be displayed using the object’s UV map or by using screen space UV coordinates. The shader provides both options because when working with objects that don’t have uniformly scaled UV’s or use that use color palettes instead of textures using the object’s UV map gives unwanted results, with different sized dots on different parts of the mesh. Enabling the use of screen-space UVs also shows a slider that determines whether the halftone patterns should scale with the object’s distance from the camera. Using screen space UVs does have one major downside, which is that the halftone patterns will move with the camera instead of sticking to objects. This is why I made the feature optional allowing the user to choose.

float2 coords = IN.screenPos.xy / IN.screenPos.w;

// Depth
float depth = tex2D(_CameraDepthTexture, coords) * max(0.003, _ScreenSpaceDepthInfluence);
coords -= float2(.5, .5);
coords *= Linear01Depth(depth);

// Account for aspect ratio
float aspect = _ScreenParams.x / _ScreenParams.y;
coords.x = coords.x * aspect;

coords = frac(coords);

o.diffusePatternUV = coords;
In the advanced options, there is also a “Black and White” toggle. This toggles whether the object should be able to receive color. This feature aims to recreate the visuals of the Spider-Noir character from Spider-Man: Into the Spider-Verse. This feature also has a slider that controls whether the black and white has smooth transitions or a single hard transition using the smoothstep function (NVIDIA, z.d.-a).


Finally, there is the dropdown menu that determines whether the material should be considered as a background or a foreground element. And if the material should write to the Z-buffer when rendering effects like Prowler Vision and Hand-Drawn frames (Unity Technologies, z.d.-e). I also created two unlit shaders to make sure unlit materials can also support this feature.


3. Post-Processing effects
Besides the custom lighting shader, I also created a collection of post-processing effects that recreate effects from the Spider-Verse movie. The first three effects are recreations of existing post-processing effects combined with different techniques to achieve a unique visual style. The last two effects completely change the image and are only enabled during specific moments instead of continuously.
3.1 CMYK Depth of Field


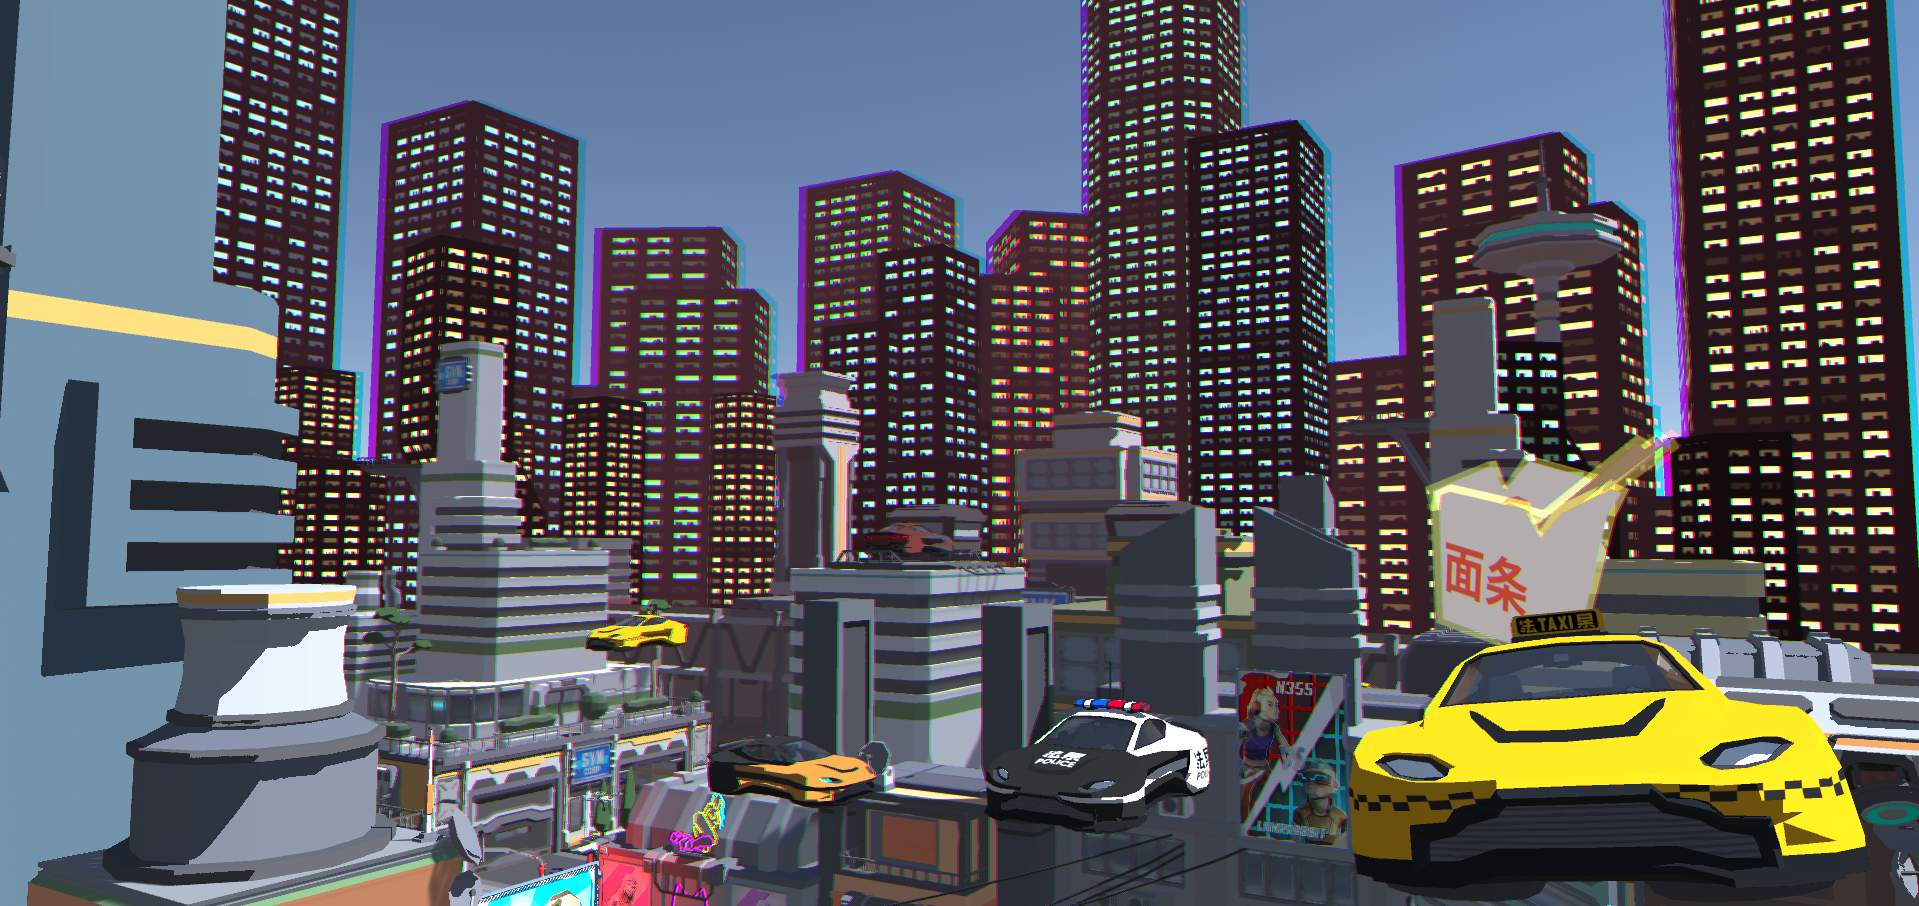
To create the effect of depth of field in the Spider-Verse movie the animation team repurposed a printing prevalent in older comic books error called CMYK offsetting (FilmJoy, 2019, 04:20–05:42). This effect can be seen in action in figure 13 on the people in the background. This printing error causes colors to be slightly misaligned. In figure 13 you can see the colors that are used in comic book printing.
I recreated the effect using the camera’s depth texture and increased the amount of CMYK offsetting as the object is further out of focus. To calculate the intensity of the offset I used the camera’s depth texture with the following formulas:
depth = LinearEyeDepth(depth);
float intensity = (depth < _FocusDistance + _FocusArea && depth > _FocusDistance - _FocusArea) ? 0 : 1;
intensity *= (abs(depth - _FocusDistance) - _FocusArea) * _OffsetIntensity;
intensity = clamp(ceil(intensity), 0, _OffsetMax);


Next, the actual offsetting is done by sampling colors from the pixels around the current pixel being rendered. The colors from these surrounding pixels are then converted to the CMYK format used when printing comic books (Rapid Tables, z.d.-b). To make sure the brightness of the objects is still mostly preserved the blacks are sampled from the current pixel. Finally, the results are combined and converted back to the RGB format (Rapid Tables, z.d.-a).
// CMYK Offsetting
const float3 colK = SAMPLE_TEXTURE2D(_MainTex, sampler_MainTex, i.texcoord + float2(0, 0)).rgb;
const float resultK = 1 - Max3(colK.r, colK.g, colK.b);

const float3 colC = SAMPLE_TEXTURE2D(_MainTex, sampler_MainTex, i.texcoord + float2(-w * intensity, 0)).rgb;
const float resultC = (1 - colC.r - resultK) / (1 - resultK);

const float3 colM = SAMPLE_TEXTURE2D(_MainTex, sampler_MainTex, i.texcoord + float2(w * intensity, 0)).rgb;
const float resultM = (1 - colM.g - resultK) / (1 - resultK);

const float3 colY = SAMPLE_TEXTURE2D(_MainTex, sampler_MainTex, i.texcoord + float2(0, h * intensity)).rgb;
const float resultY = (1 - colY.b - resultK) / (1 - resultK);

// Convert back into RGB
float4 result = float4(
  (1 - resultC) * (1 - resultK),
  (1 - resultM) * (1 - resultK),
  (1 - resultY) * (1 - resultK), 1);
The resulting effect offsets the parts of the image that don’t fall inside the focus area with increasing intensity as it lies further away from the focus point. You can see this effect on the buildings in figure 16.
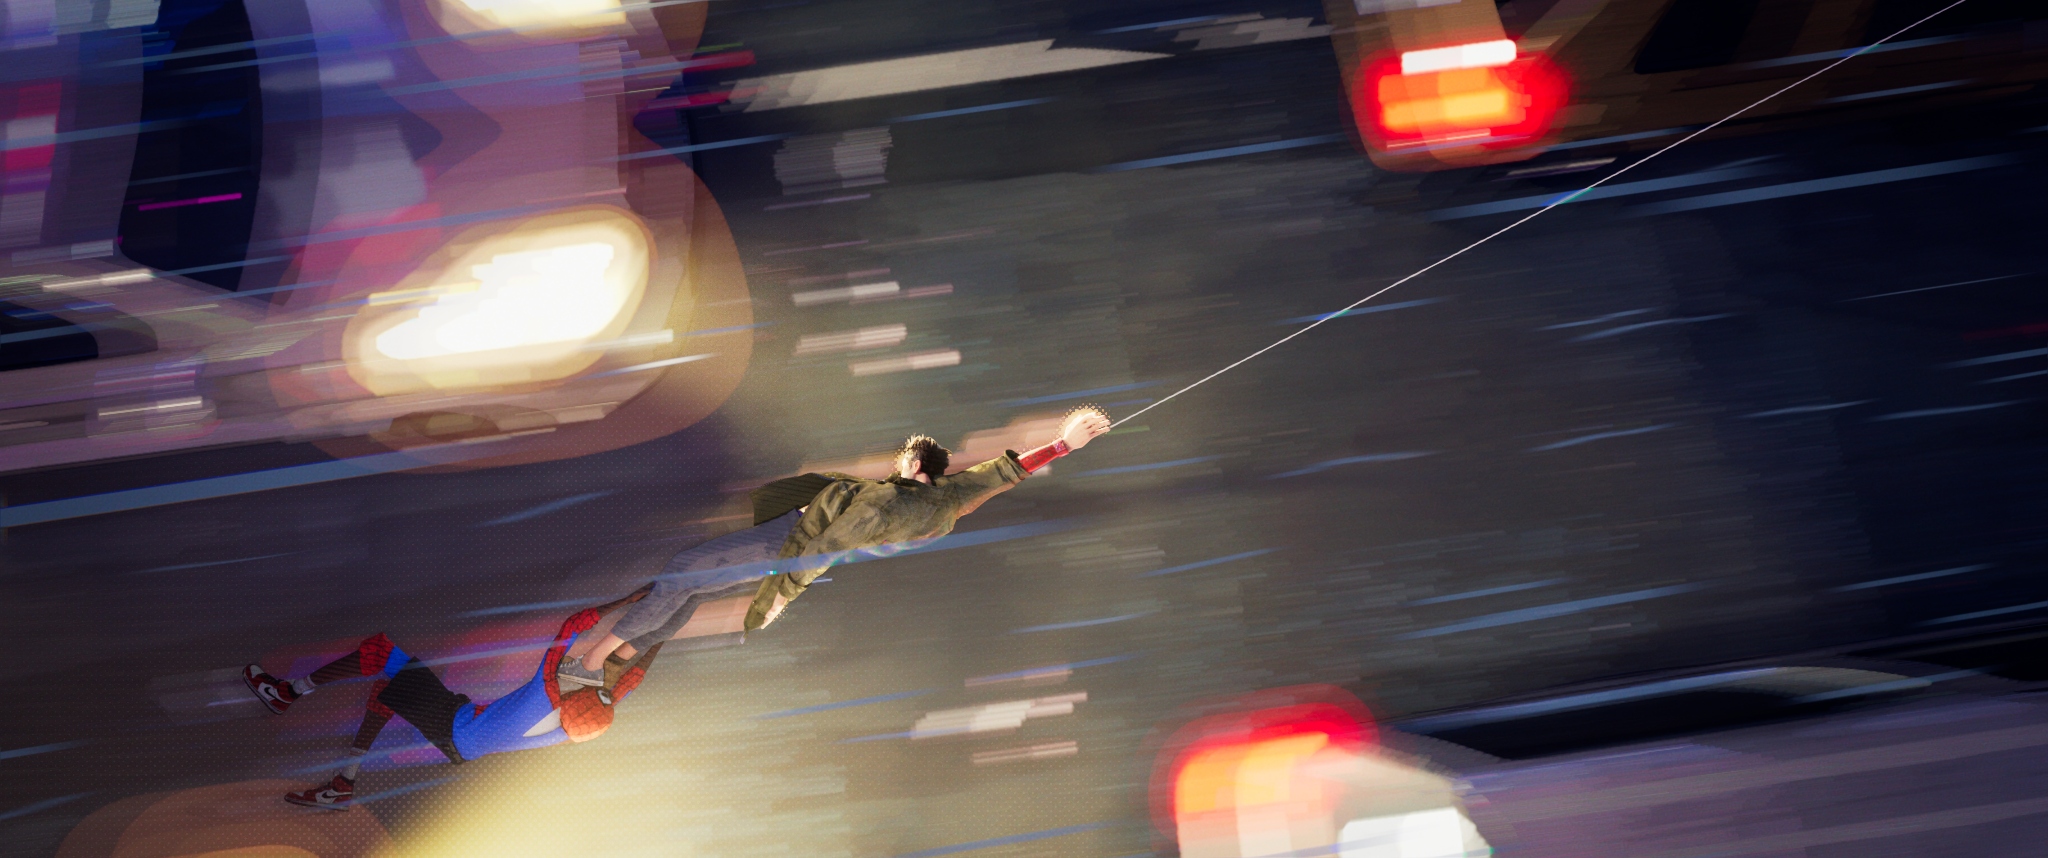
3.2 CMYK Motion Blur
To create a motion blur effect similar to the movie’s motion blur I also used CMYK offsetting but instead of using the camera’s depth texture to determine the intensity I used the camera’s motion vector texture (FilmJoy, 2019, 05:42–05:10). This way fast-moving objects will have their colors offset and appear blurred. To calculate the intensity I used the following formulas:
float2 motionVector = SAMPLE_TEXTURE2D(_CameraMotionVectorsTexture, sampler_CameraMotionVectorsTexture, i.texcoord).rg;
float intensity = length(motionVector) - _MinMotion;
intensity *= _OffsetIntensity;
intensity = clamp(ceil(intensity), 0, _OffsetMax);
This transforms the camera’s motion vector texture into an intensity for the CMYK offsetting as you can see below.


Next, the CMYK offsetting is done using the exact same calculations as with the depth of field effect. The result gives a bit of a trippy feel on fast-moving objects as you can see in figure 20.
3.3 Halftone Bloom
A common effect in the Spider-Verse movie is a halftone bloom effect. Bloom is also a very common effect in games and has been implemented a lot of different times. To recreate this effect I first created a basic bloom effect without halftones. To do this I created a post-processing effect that uses 4 passes. The first pass determines what part of the image is overexposed and should receive bloom.


The next two passes blur this image. My first attempt at this was using a dual-pass technique that uses lots of texture samples per pixel to achieve the effect. I thought this technique would work because it was easy to scale the intensity of the blur by just increasing the area that is sampled. But with my implementation increasing the area also dramatically increased the number of texture samples. And apparently, the GPU didn’t appreciate having to sample a texture 68 times for every pixel on the screen at higher intensities.


This is why I reworked the blur passes by using progressive downsampling and upsampling averaging the color of the 4 pixels surrounding each pixel. This results in far fewer texture samples per-pixel. I also made sure the intensity of the effect didn’t influence the number of samples taken this time around.
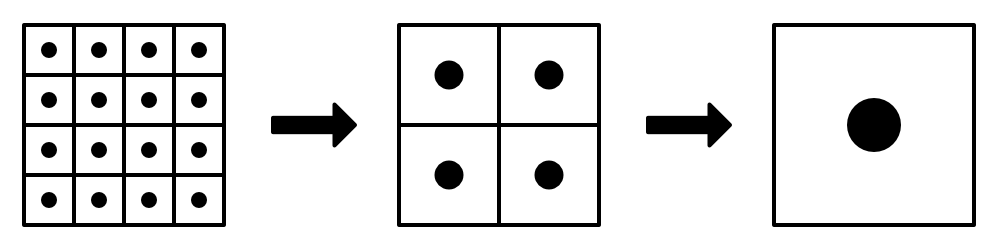
This results in a texture similar to our mask texture but with blurred edges.

The final step is to turn this texture into a halftone pattern. To calculate this texture I took inspiration from the procedural pattern samples from unity’s shader graph (Unity Technologies, z.d.-b). With these methods, I can generate a halftone dot pattern with customizable size, scale, and offset. I also allow the user to rotate the halftones by copying the rotate UV node from shader graph (Unity Technologies, z.d.-a).
half circle(float2 uv, half size)
{
    half d = length((uv * 2 - 1) / half2(size, size));
    return saturate((1 - d) / fwidth(d));
}

half dots(float2 uv, half size, half tiling, half offset_x, half offset_y)
{
    uv *= tiling;

    // alternating X axis uv tiles
    half tiles_x = uv.x + (step(1, uv.y % 2) * offset_x);

    // alternating X axis uv tiles
    half tiles_y = uv.y + (step(1, uv.x % 2) * offset_y);
    const float2 tiles = float2(tiles_x, tiles_y);

    return circle(frac(tiles), size);
}
Applying this effect to our blurred mask texture gives us the following result.

This texture is then blended with the original image to apply the effect to the scene which you can see in figure 27.

3.4 Hand-Drawn frames
In the Spider-Verse movie, they are multiple moments where instead of using 3d animation frames are hand-drawn by artists (Insider, 2019, 04:15–04:54). To recreate this effect in unity I wanted to allow artists to create heavily stylized frames with vibrant backgrounds. To allow for this freedom the Hand-Drawn post-processing effect renders all characters without any lighting and with a texture especially set for this effect. The background elements are replaced with a single texture that covers the entire screen.
To determine which elements are rendered as the foreground the entire scene is rendered again using a replacement camera (Unity Technologies, z.d.-c). This camera renders all objects that have the Spider-Verse replacement tag. The objects with the foreground tag are rendered with their unique textures and an alpha of 0. The background is rendered in black with an alpha of 1. The background no ZWrite objects are not rendered at all. To be able to mask out the background from the foreground when applying the background texture the alpha channel is used.


The effect then renders the foreground objects with the special textures and renders a texture in place of the background. As a final touch, I also added an optional outline on the edge of the foreground that uses a dual-pass outlining method similar to the one used in the first implementation of the halftone bloom effect.
I also implemented a simple script that triggers the effect for a short duration to improve the ease-of-use of the effect. This script can also randomize the background texture used.


3.5 Prowler Vision
The final effect I created for this project was the Prowler Vision post-processing effect. This effect is seen in only two scenes in the movie for very short periods of time. So the effect isn’t exactly core to the visual style, but I still decided to create it because I think it’s just too cool not to.

To recreate this effect I reused the replacement texture from the Hand-Drawn effect to color the scene. The foreground of the scene becomes a solid yellow to make the foreground elements stand out. The background is tinted with a dark blue color so the environment is still slightly visible.

Next, the foreground’s edge is outlined just like in the Hand-Drawn effect using the same dual-pass technique.

Finally, all the elements are outlined using both the camera depth and normal textures. To create these outlines for every pixel 4 surrounding pixels are checked and the difference in both depth and normal direction is determined (Ameye, z.d.). The influence of the depth and normals can be controlled in the inspector. The color of the background’s outlines is also different from those of the foreground.
// Determine outline color
half4 original = SAMPLE_TEXTURE2D(_MainTex, sampler_MainTex, UV);
half4 OutlineColor = (BackgroundOutlineColor * step(0.75, original.a)) + (ForegroundOutlineColor * step(0.75, 1-original.a));

// Depth
float depthFiniteDifference0 = depthSamples[1] - depthSamples[0];
float depthFiniteDifference1 = depthSamples[3] - depthSamples[2];
half edgeDepth = sqrt(pow(depthFiniteDifference0, 2) + pow(depthFiniteDifference1, 2)) * 100;
half depthThreshold = (1/DepthSensitivity) * depthSamples[0];
edgeDepth = edgeDepth > depthThreshold ? 1 : 0;

// Normals
half3 normalFiniteDifference0 = normalSamples[1] - normalSamples[0];
half3 normalFiniteDifference1 = normalSamples[3] - normalSamples[2];
half edgeNormal = sqrt(dot(normalFiniteDifference0, normalFiniteDifference0) + dot(normalFiniteDifference1, normalFiniteDifference1));
edgeNormal = edgeNormal > (1/NormalsSensitivity) ? 1 : 0;

half edge = max(edgeDepth, edgeNormal);

As a final touch, I wanted to add an animation for the effect’s boot-up sequence. For this animation, I create a wave-like effect that moves away from the camera using the camera’s depth texture (Ronja, 2018). But because this is a Spider-Verse style effect it still desperately needed some halftones. To add halftones I used the same formulas as I did for the halftone bloom effect.
This looked okay, but it doesn’t really communicate a boot-up sequence effectively. To fix this I wanted to not have the effect fill the entire screen immediately. That’s why I chose to only apply the effect on the parts of the image the wave had already passed.
4. Conclusion
happy with created effects and halftone shaderlight shafts and animation on twos are missing, explain whylack of reflections- learned a lot about writing shaders, more comfortable with shader code
- publishing on the asset store
I am happy to say the final collection of effects contains all of the effects I initially defined as essential as well as two optional effects. All of the effects have been tested on performance and compared to unity’s implementation of a similar effect when one was available. The only effect that is less performant than unity’s implementation is the halftone bloom effect with 0,483 ms compared to unity’s 0,083 ms on the GPU. The hand-drawn and Prowler Vision effects both also have a significant impact on GPU performance because they both use a replacement shader and have to render the scene twice. Still, all the effects are viable for use in real-time applications like games so I’m very satisfied with those results.
When comparing screenshots of my effects and shaders to screenshots of the Spider-Verse there are clear differences between the effects. These are especially noticeable with the hand-drawn and Prowler Vision effects. So my effects aren’t one-to-one recreations of Spider-Verse’s implementations, but I do believe my effects come close to create that unique comic book visual style. And judging from the feedback I received from both fellow students and teachers my recreation of the style is working very well.
Because I initially said I wanted to publish this project onto the unity asset store I have exported the project into a unitypackage and put extra effort into making the system easy to use in any project. I currently plan on releasing this project for free because I have never released anything on the asset store before. Before releasing this project on the asset store I will have to rebrand towards a less copyright-sensitive name that doesn’t include “Spider-Verse”.
5. Future Work
If I were to continue this project there are still a few things I could add that would improve this project significantly. First of all, to be able to use this in a larger game project transparent shaders in the Spider-Verse style should be available. These are currently missing, even though I did experiment with adding a transparent mode to the custom lighting shader I wasn’t able to do this. A specialized glass shader that recreates Spider-Noir’s eyes such as the one created by Lester Tusi would also be a really nice addition (2020).

Something I initially wanted to add to this project is halftone light shafts. This effect is used a lot in the movie and can impact the style a lot. I wasn’t able to add this effect during the 4 weeks of this assignment because it fell outside of the scope of the project.

The final important thing I think is currently missing from the project is the lack of reflections in the custom lit shader. Reflections are used a lot in the Spider-Verse movie so they would make a really good addition to this project.

6. Sources
Ameye, A. (n.d.). Outline Shader. GitHub. Retrieved 30 March 2021, from https://alexanderameye.github.io/outlineshader
Arycama. (2017, May 3). Surface shader multi compile with different transparency parameters. Unity Forum. https://forum.unity.com/threads/surface-shader-multi-compile-with-different-transparency-parameters.469173/
drukbedrijf. (2017, September 20). Offset Printen [Illustratie]. drukbedrijf. https://www.drukbedrijf.nl/blog/wat-is-offset-drukken/
FilmJoy. (2019, May 14). The Tech of Spider-Man: Into the Spider-Verse – Movies with Mikey [Video]. YouTube. https://www.youtube.com/watch?v=DPpjdU2MhUQ&ab_channel=FilmJoy
Flick, J. (2018, January 31). Progressive downsample [Illustratie]. catlikecoding. https://catlikecoding.com/unity/tutorials/advanced-rendering/bloom/blurring/progressive-downsample.png
Insider. (2019, February 21). How ‘Spider-Man: Into The Spider-Verse’ Was Animated | Movies Insider [Video]. YouTube. https://www.youtube.com/watch?v=jEXUG_vN540&t=265s&ab_channel=Insider
Learn OpenGL. (n.d.-a). LearnOpenGL – Basic Lighting. Retrieved 30 March 2021, from https://learnopengl.com/Lighting/Basic-Lighting
Learn OpenGL. (n.d.-b). Two pass gaussian bloom [Illustratie]. LearnOpenGL. https://learnopengl.com/img/advanced-lighting/bloom_gaussian_two_pass.png
Lord, P. (Producer), Miller, C. (Producer), Persichetti, B. (Director), & Ramsey, P. (Director). (2018). Spider-Man: Into the Spider-Verse [Motion Picture]. Culver City, CA: Sony Pictures Animation.
NVIDIA. (n.d.-a). Smoothstep. NVIDIA Developer Zone. Retrieved 30 March 2021, from https://developer.download.nvidia.com/cg/smoothstep.html
NVIDIA. (n.d.-b). Step. NVIDIA Developer Zone. Retrieved 30 March 2021, from https://developer.download.nvidia.com/cg/step.html
Rapid Tables. (n.d.-a). CMYK to RGB conversion | color conversion. Retrieved 30 March 2021, from https://www.rapidtables.com/convert/color/cmyk-to-rgb.html
Rapid Tables. (n.d.-b). RGB to CMYK conversion | color conversion. Retrieved 30 March 2021, from https://www.rapidtables.com/convert/color/rgb-to-cmyk.html
Tusi, L. [@lestertusi]. (2020, September 23). Lester Tusi’s anime glasses glare shader created in blender [Tweet]. Twitter. https://twitter.com/lestertusi/status/1308710069039628289
Unity Technologies. (n.d.-a). Rotate Node | Shader Graph | 10.4.0. Unity Shader Graph Manual. Retrieved 30 March 2021, from https://docs.unity3d.com/Packages/com.unity.shadergraph@10.4/manual/Rotate-Node.html
Unity Technologies. (n.d.-b). Shader Graph samples | Shader Graph | 7.1.8. Unity Shader Graph Manual. Retrieved 30 March 2021, from https://docs.unity3d.com/Packages/com.unity.shadergraph@10.4/manual/ShaderGraph-Samples.html
Unity Technologies. (n.d.-c). Unity – Manual: Rendering with Replaced Shaders. Unity Documentation. Retrieved 30 March 2021, from https://docs.unity3d.com/Manual/SL-ShaderReplacement.html
Unity Technologies. (n.d.-d). Unity – Manual: Shader variants and keywords. Unity Documentation. Retrieved 30 March 2021, from https://docs.unity3d.com/Manual/SL-MultipleProgramVariants.html
Unity Technologies. (n.d.-e). Unity – Manual: ShaderLab culling and depth testing. Unity Documentation. Retrieved 30 March 2021, from https://docs.unity3d.com/Manual/SL-CullAndDepth.html
Unity Technologies. (n.d.-f). Unity – Manual: Writing Surface Shaders. Unity Documentation. Retrieved 30 March 2021, from https://docs.unity3d.com/Manual/SL-SurfaceShaders.html
Unity Technologies. (2019, December 17). Unity – Post-processing and URP – The plan. Unity Forum. https://forum.unity.com/threads/post-processing-and-urp-the-plan.795456/
WIRED. (2019, March 22). How Animators Created the Spider-Verse | WIRED [Video]. YouTube. https://www.youtube.com/watch?v=l-wUKu_V2Lk&feature=youtu.be&ab_channel=WIRED